DIY Distressed T-Shirt and Jeans Guide
Table of Contents
What goes around, comes around, right? This is true to many things in life, and is especially true to fashion. Every generation has their own way of rediscovering bands like the Beatles, and every generations has its own way of rediscovering distressed clothing. You’ve done, I’ve done it, and our parents have done it. It used to be that your clothes would tell a story. That’s the ideal, anyway. Ripped and worn clothing had a way of letting others (and yourself) know that these jeans, that shirt, those shoes – well, they have been through some major adventures. There have always been those who have shelled out some money in order to achieve that look faster. Nothing wrong with that.
Nowadays, the comeback of distressed clothing is taking ripped and worn to a whole new level. Or so it seems to me, and I am not alone here. It’s not just torn or ripped anymore. No no. It is positively shredded. And you know what? it works. It just does. It projects an image which is fun, and carefree, and wild in its way, and everyone is doing it.
Why Distressed Clothing?
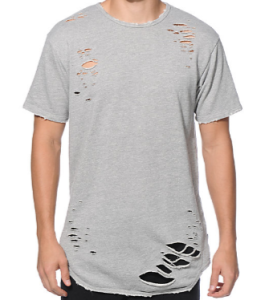
DIY Distressed T-Shirt

DIY Distressed T-Shirt
The first and foremost reason for wearing anything should be because you like the way it looks on you. This part is important, because distressed clothing has the potential to look like absolute junk when it isn’t being worn. Once you slip into it, though, you may find it looks great on you. It is not the kind of fashion you can simply look at. It is something you need to experience.
Wearing ripped and torn clothing is fun. It has this attitude about it which seems to say that you go with the flow. Taking the “oops, there’s a hole in my shirt” to the extreme is a new way of handling clothes. What you would once throw away, you now proudly wear. There is something cool about that, in my opinion. It means that your clothes are yours, even when they are ripped to shreds.
DIY Distressed T-Shirt Guide and Instructions
The thing about good, high-quality distressed clothing is that it can cost a lot of money in stores. In order to get the results you want out of any fabric – and denim in particular – you need to treat it right. And that means that certain companies will do just that. They will make a good, quality pair of denim jeans, and charge you plenty of money for it.
There is another option, which is: distressing your own clothing. DIY projects are not only fun – as we’ve covered in the past with DIY MacBook skins and Dreamcatchers – they’re really practical! It can be a difficult task, which is why many choose to skip it and hand over the money for a pre-distressed shirt or jeans . But ultimately, if you want your clothing to tell a story – your story – why not write it yourself?
How To Distress a Shirt With Bleach
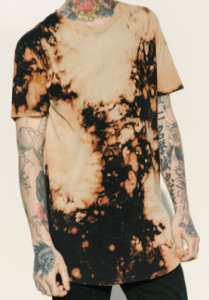
DIY T-Shirt Distressed With Bleach

DIY T-Shirt Distressed With Bleach
Shirts are easier than other items of clothing, so let’s begin there. Bleaching a shirt is one of the best and easiest ways to get that destroyed look. You can use old shirts which you (or others) have lying around, and haven’t thrown out yet. Those, I feel, are the most fun to distress and re-wear. It is a form of recycling, which I am all for.
What you will need is a bleach and water mix, pattern-making tools of your choosing, and a few t-shirts. Now, this part is important. This is not going to have a professional kind of look, and it is not meant to. It greatly resembles making home tie dyes. You have fun making them, and they look good, but do they look professional? No. I love that homemade look, personally, which is why I sincerely advocate bleaching old shirts. No two shirts are alike, and I see that as a great advantage.
Wherever you want the most bleaching to occur, you need to keep that spot saturated in the mix you prepared. The more bleach you use, and the longer it sits in it, the whiter it will get. You can also use the bleach mix in a spray bottle, and create areas where the bleach is less pronounced, more pronounced, etc. Use your imagination! Use twists, ties, and even stencils if you want.
Remember to get the back of the shirt as well. You may not see the back of it when it is being worn, but others do. It is still a part of the shirt as a whole, so pay some attention to it, assuming that you want it to look like a complete piece of work.
After you are done bleaching the shirts to your heart’s desire, wash them. NOTE: Do NOT wash these items in your ordinary washing machine, and certainly do not wash them with anything else that needs washing. The amount of bleach which is normally used in such processes can cause a lot of harm to different machines or delicate items of clothing. Use a bucket, a sink, a small tub, or any other apparatus which you feel will help you achieve the goal. Once you are done washing your shirts, let them dry. You can either do this with an electric drier (use a low setting), or let them air dry.
DIY Distressed Jeans Guide and Instructions
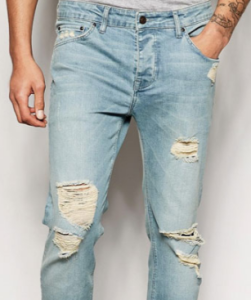
DIY Distressed Jeans

DIY Distressed Jeans
Another fun project for you to work on. Great for any warmer weather, and it looks great. Distressed denim is one of my favorite things to wear in the summer, and I loved creating my own pairs out of old jeans.
First, you will need to use jeans which you don’t mind distressing, obviously. If you aren’t confident enough to use a pair you like, use a pair you don’t like, for practice purposes. Get yourself a blade and perhaps some sandpaper, and get to work.
You can mark off the top and bottom of the areas you wish to distress, using a pan or sharpie. Be creative, but be cautious with your blade. You can always rip it more. Start small, and perhaps start at areas where wear would occur naturally, like the the knees, or the front and back pockets. Think of it as simply magnifying the distress which would occur under normal circumstances. This also means the edges of the pants, where fray happens due to our footwear, and even the opposite edge, where the waist sits.
You can use a shaving razor or sandpaper of varying sizes to create different rips, tears, cuts, and even patterns. Make some larger incisions if you wish, but remember that the washing machine will also have its say.
Once you are done distressing your denim, throw it in the wash for a spin, and then repeat the process, before drying them. You can machine dry or air dry. Whichever is more convenient.
Buying designer jeans is something which some people need. I understand it, I get it, and I’ve done it. But if you are part of the DIY crowd, then this is one of the easiest and most inexpensive ways of achieving the worn, torn, grungy look for yourself and your denim. It is a great fabric to work with, and distressing it can be a lot of fun.
https://twitter.com/KimnishaL/status/829095540587630593
Bonus: DIY Distressed Beanie Guide and Instructions
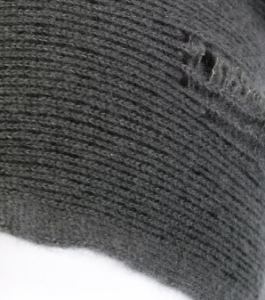
DIY Distressed Beanie

DIY Distressed Beanie
Distressing hats on your own is also relatively easy, and while distressed hats may not be as expensive to buy as shirts and pants, there is still some merit – and great fun – in doing it on your own. Again, if you need any kind of practice, use a hat you may not be a fan of.
Use scissors, a shaving razor, or even a grater in order to peel off some layers of fluff and stuff. It is all about making a beanie look worn and frayed, without compromising its ability to actually stay on and function as a beanie should. There is a delicate balance there, so take your time, use caution, and think ahead. Remember, just like with the other types of clothing, you can always continue ripping them later. Initially, it should be something more subtle, until you find your middle ground. At some point – and this may be especially true to beanies – it may become too useless! But, it is a personal thing. While it is undoubtedly important to look good, it is also of the utmost importance that you actually feel comfortable in your clothes.
Conclusion
Distressed clothing is a great trend. It goes around and comes back, and I love being a part of it. It’s a great ride, fashion, it really is. And doing it yourself, putting in the effort – in my opinion it makes it that much more special. This kind of DIY is an inexpensive way to be unique and wear real pieces of art. Think about it – all of your distressed clothing will be one-of-a-kind if you create them yourself. Go for it. Find some clothes you want to experiment on, and have fun. As the great Bob Dylan once wrote: don’t think twice, it’s alright.
No comments yet.