Tips and Tricks for Microsoft Word 2016
Table of Contents
- Collaboration Made Easy
- Utilizing the “Tell Me” Tool
- Information At Your Fingertips: Smart Lookup
- Quick Layout Options
- Add Pictures and Graphics Only When Document is Complete
- Always Save and Backup Your Work
- Applying Styles
- Create Your Own Labels with Graphics
- Word 2016 Quick Tricks
- Word 2016 Keyboard Command Shortcuts
Until recently, I was still using Word 2010, and though I haven’t given in to the pressure to upgrade to Windows 10, I did upgrade to Office 2016. There are a whole host of new goodies and features to play with. Some of these are carry overs from previous versions, but you might not have known about them. This is not an article on all of the new features – rather, it is aimed at pointing out the best ways of utilizing those (and existing) features, quickly and efficiently. Whether you’re new to Microsoft Word (I can’t imagine how, considering it is one of the most widely used programs on the planet) or use it daily, here are the best Tips and Tricks for Microsoft Word 2016 for getting the most out of your new word-processing software:
Collaboration Made Easy
Microsoft Word 2016
Microsoft Word 2016
Microsoft has eliminated the need to switch between programs to edit documents and communicate with each other. Whenever you save a Word document to OneDrive or SharePoint, it can be shared with different people, who can “co-author” them as well as chat between each other within Word and talking over Skype, which is integrated with Office.
Here’s how to do so:
- Save the Word document you wish to share on to OneDrive or SharePoint.
- Click the Share button on the top right side of your toolbar. In the Share box, under Invite People, type the email address(es) for the people you want to have access to your document. Next, choose the editing rights, add an optional message to your invitation, and click on Share to send out the invite. Set the “automatically share changes” option to Ask me or Always.
- When any of your co-authors work on this document, you will receive a notification asking for your permission to implement real-time updates for changes made by others. Select Yes to allow this. You will be able to see the changes others make to the document and edit them as a document owner. This mean that you will always remain in control, and your changes cannot be edited by others.
Utilizing the “Tell Me” Tool
Word’s “Tell Me” Tool
Word’s “Tell Me” Tool
This handy tool allows users to quickly search for functions instead of navigating Office’s labyrinth of menus, and gets you all the help you need on the spot. The feature then provides one or several appropriate options which can be selected. “Tell Me” is not just for new users. In many ways, it is for advanced users who just forget how to use advanced features or use so many apps they get them confused easily.
Here’s how to do so: Look for a box called “Tell me what you want to do” in the Ribbon and start typing keywords for what you need help with. If you’re in doubt about a Word 2016 feature or in a hurry, get quick help by typing in the box. The app will provide you with the most used commands and a link to detailed help on the keyword!
 Information At Your Fingertips: Smart Lookup
 Information At Your Fingertips: Smart Lookup
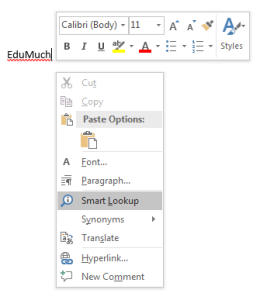
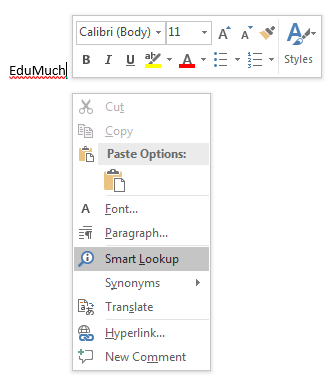
When you click on Smart Lookup, the Insights pane appears to the right of your Word 2016 window, providing you with contextual content sourced by Bing. The “lookup” function, allows users to select a word or phrase and either look it up in a dictionary or search the web for it. This brings extra information and images into the sidebar when you search for a term, allowing context without leaving Word.
Quick Layout Options
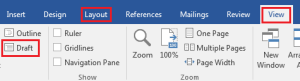
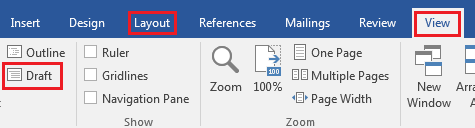
Word has some great layout options. I generally use and recommend two: one for fast viewing, the other for fast text editing. In order to quickly see how your entire document will look when printed, all you need to do is change to the View ribbon tab and then select the Print Layout view. This will show you exactly how your document will appear on paper to be printed.
Word Tricks
If you have a longer document and you just want to see a quick overview, you can view multiple pages at once by selecting Multiple Pages, which is next to the Zoom feature on the Ribbon. From here, you can scroll quickly to make sure your
document will look correct when printed. The text will appear small, but remember that this view isn’t for reading your text, it’s for the overall look of it on a page. You can also click the pop-out dialog in the Zoom section of the ribbon to get more pages in the view. If your document has complex formatting or lots of images, you can quickly and easily focus on just the text by remaining in the View ribbon tab and selecting the Draft view. To remove visual clutter such as images, photos, clipart, margins and column formatting, you can use Draft view. All that will be left is your text and styles such as Headings, so that you can edit your text quickly and easily.
Add Pictures and Graphics Only When Document is Complete
Here is a simple rule to remember – Write first, then format, and then edit. When you have finished writing, only then should you go back to insert a picture or graphics into the document. Doing these tasks last will keep you focused on writing, which is the main part of your document. Also, it’ll be easier for you to format the page the way you want the text to look, without clutter. Once you get it looking as it should, add the graphics and fine tune it.
Always Save and Backup Your Work

Always Save Your Work!
Always Save Your Work!
I cannot stress this enough- Save your work constantly. You can set the autosave feature to save at regular intervals, but even using that, I try to train myself to save after every added paragraph, especially if it is an important one. I cannot tell you how many times my computer froze or crashed right before it saved. This is frustrating beyond belief, and it is so easy to avoid the heartache by constantly saving. You’ll never lose more than a few minutes of work. You should also have two copies of everything you write, especially the documents that are important to you personally or professionally. Keep the original copy on the computer’s main storage device. A second copy, or backup, should also be made, to be kept off your computer in case something happens to your hard drive.
You can store it on external storage devices, but if you wanted to access the copy, you’ll need to physically have contact with that device. An easier option is cloud storage. That’s because the original stays on the computer’s local storage system and the cloud copy is available on the Internet, from any device that has Internet access.
Applying Styles
In Word, styles are used to set text to pre-formatted configurations. A single style can contain font size, color, line spacing, borders and more. You always begin with the default style, but you can choose a different style and have it saved, ensuring you always have consistent formatting throughout your document. A Word document’s default style is Normal, but you can change to a different style at any time from the Home ribbon tab by clicking on a predefined one in the style group. You can also create a new style or modify an existing one. This is useful if you’ve formatted a particular paragraph, heading, or block of text to fit the look and feel of your organization or subject.

We Never Go Out of Style!
Here’s how to do it:
- Start by purging styles you don’t want in the Gallery.
- Click the down-pointing arrow to reveal the entire Style Gallery.
- Right-click a Style tile.
- Choose the command Remove from Style Gallery.
- To modify an existing one, right-click the style and select Modify.
- To create a new style, click the arrow to the right below the style group, and click New Style.
- Display the Styles pane.
- Press Ctrl+Alt+Shift+S, which is Word’s most memorable keyboard shortcut.
- Right-click one of your styles.
- Choose the command Add to Style Gallery.
The style won’t be removed from the Styles pane, it will remain there, but it now shows up in the Style Gallery, which you might find more useful.
Create Your Own Labels with Graphics
Word allows you to print sheets of identical labels, but they contain only simple text. You can get creative here by adding color, fancy fonts, and formatting. The best way to make your label stand out is to add a picture or other graphics.
To do so, follow these steps:
- Click the Mailings tab.
- Click the Labels button in the Create group section. The Envelopes and Labels dialog box appears, Label tab forward.
- Make sure the proper label format is chosen in the lower-right part of the dialog box. Click the label thumbnail to change the format.
- Type the label’s text into the Address box, and ensure that the item Full Page of the Same Label is chosen.
- Click the New Document button. A whole sheet of identical labels is created.
The following steps add the graphics:
- Click the Insert tab.
- Click the Pictures command button.
- Use the Insert Picture dialog box to choose the image you want to add. Click the select the image, and click the Insert button. If the image is the wrong size or at the wrong location, you can easily fix it.
- Ensure that the image is on the first label. The first label is currently the master label; you’ll duplicate the image in a later step.
- Click one of the eight handles around the image to resize it. The image needs to fit properly on a single label.
- Click the Layout Options button. If you don’t see the Layout Options button, click the image. The button appears near the image’s upper right corner.
- Choose the Square layout and position the image on the first label. The Square layout button is the first button below the With Text Wrapping heading, on the left. Use the mouse to drag the image to the proper spot. With the first label set the way you want all the labels to appear, you now need to duplicate the image.
- Click the Mailings tab. Word needs to think you’re creating a merged list of labels.
- Click the Start Mail Merge button and choose Labels. The Label Options dialog box will pop-up.
- Click the Cancel button.
- In the Write & Insert Fields group, click the Update Labels button. The graphic is copied to all labels on the sheet. You’ll see the text <<Next Record>> is also copied. You need to remove that text. This can be a bit annoying, but you can do so easily by following steps the next steps.
- Carefully select the text <<Next Record>> including the angle brackets on either side. You have to select the whole thing; clicking only the field turns it gray. That’s not selecting! Drag the mouse over the entire thing to select it.
- Press Ctrl+C to copy that text.
- Press Ctrl+H to conjure up the Find and Replace dialog box.
- Press Ctrl+V to paste the text in the Find What box. Leave the Replace With box blank.
- Click the Replace All button. At this point, Word may replace only the selected text. That’s fine: Click the Yes button to continue replacing throughout the entire document.
- Click OK when the search-and-replace operation has been completed, and you’ll no longer have the text “<<Next Record>>.” Now your labels are ready to save and print.
Word 2016 Quick Tricks
Here’s a short list of some of the most helpful Microsoft Word 2016 tricks that may come in handy when you compose a new document. Keep these suggestions in mind for an easier and faster word-processing experience:
- To start a new page- Press Ctrl+ Enter. This key combination inserts a hard page break, which forces a new page automatically.
- To increase text size- Select the text, then press shift+ ctrl+>.
- To decrease text size- Select the text, then press shift+ ctrl+ <.
- To insert a soft return- Press Shift+ Enter. This is useful for breaking a line of text, such as in a document title or an address.
- Select a sentence- Ctrl+ Left-click anywhere on a sentence to highlight it.
- Line up your text with tabs- Do not use spaces for this task. One tab is all you really need. If you insert more than one tab, you will need to reset the tab stops.
- Create a horizontal line- Type in three hyphens and then press enter.
- To line up columns- Use one tab between the columns. Doing so will make editing the information easier.
- To change page formatting mid document- Begin a new section. Doing so will allow you to use multiple page-format attributes in a single document.
- Select a paragraph- Three rapid left-clicks anywhere on a paragraph will highlight the whole paragraph.
- Save your styles in a template- By doing so, you will be able to use them for documents you create without having to rebuild all your styles over and over from scratch.
- Return cursor to previous save location- You can move the cursor to the location it was in when you last saved the document by pressing on shift + F5.
- Delete the proceeding word- Press backspace while holding down the ctrl key.
Word 2016 Keyboard Command Shortcuts
Since the keyboard is faster to use than the mouse, for common activities, such as Copy, use the keyboard shortcut instead, Ctrl+C in this instance. Just about every Word command has a keyboard shortcut. For those that don’t, you can use accelerator keys on the Ribbon.
Don’t be scared at the amount of shortcuts, you don’t need to memorize them all. You’ll quickly figure out which are most useful to you, and use those more often. Use them often enough, and you’ll remember them no problem.
Here are some of the options you can utilize for cursor movement:
| Pressing This Key | Moves the Insertion Pointer . . . |
| PgUp | Up one screen |
| PgDn | Down one screen |
| Home | To start of current line |
| End | To end of current line |
| Ctrl+Home | To top of document |
| Ctrl+End | To bottom of document |
Here are some basic helpful editing:
| Copy | Ctrl+C |
| Cut | Ctrl+X |
| Paste | Ctrl+V |
| Undo | Ctrl+Z |
These useful commands come in handy when you need to do some text formatting:
| Bold | Ctrl+B |
| Italic | Ctrl+I |
| Double underline | Ctrl+Shift+D |
| Word underline | Ctrl+Shift+W |
| Small caps | Ctrl+Shift+K |
| Superscript | Ctrl+Shift++ |
| Subscript | Ctrl+= |
| Clear formatting | Ctrl+spacebar |
| Grow font | Ctrl+Shift+> |
| Shrink font | Ctrl+Shift+< |
| ALL CAPS | Ctrl+Shift+A |
| Font dialog box | Ctrl+D |
These are some commands that will help simplify paragraph formatting:
| Center text | Ctrl+E |
| Left-align | Ctrl+L |
| Right-align | Ctrl+R |
| One-line spacing | Ctrl+1 |
| 1-1/2-line spacing | Ctrl+5 |
| Two-line spacing | Ctrl+2 |
| Justify | Ctrl+J |
| Indent | Ctrl+M |
| Unindent | Ctrl+Shift+M |
| Hanging indent | Ctrl+T |
| Un-hang indent | Ctrl+Shift+T |
These commands insert something:
| Today’s date | Alt+Shift+D |
| Current time | Alt+Shift+T |
| Paste special | Alt+Ctrl+V |
| Footnote | Alt+Ctrl+F |
| Endnote | Alt+Ctrl+D |
| Comment | Ctrl+Alt+M |
And finally, here are some popular Word keyboard shortcuts:
| Help | F1 |
| Cancel | Escape |
| Go back | Shift+F5 |
| New document | Ctrl+N |
| Open screen | Ctrl+O |
| Ctrl+P | |
| Close document | Ctrl+W |
| Quick save | Ctrl+S |
| Repeat | Ctrl+Y |
| Find | Ctrl+F |
| Find and replace | Ctrl+H |
| Insert hard page break | Ctrl+Enter |
Word 2016, like its predecessors, is an excellent word processing tool that has some nifty new features and is cross-platform. That means that you can use it on your PC and Mac computers, as well as getting versions that work on your other Windows 7+ devices (phones and tablets). The above shortcuts though are meant to enhance and simplify your PC experience of Word 2016. Research to find out tips and tricks on other platforms.
Want to check out other Word processor applications? Learn about WordPerfect and WordPerfect X7 here at EduMuch!
No comments yet.